
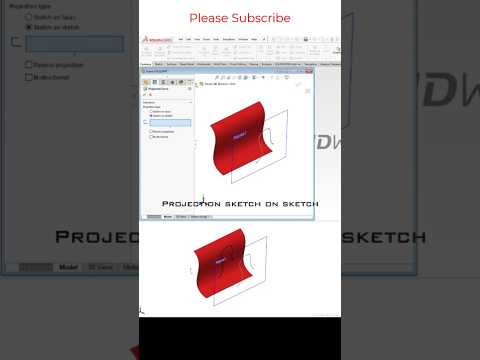
Creating complex 3D geometry in SolidWorks can sometimes feel challenging, especially when dealing with organic shapes, sweeping paths, or intricate designs that don’t align with simple 2D planes. Fortunately, SolidWorks offers powerful tools to simplify advanced surface modeling. In this concise SW tutorial, we’ll explore one of the most versatile time-saving features: the Projection Curve tool.
What is a Projection Curve in SolidWorks?
A Projected Curve is a 3D curve generated by projecting a 2D sketch onto a curved surface or by combining two intersecting 2D sketches created on different planes. Instead of struggling to draw a complex 3D sketch manually, this feature allows you to define two simple 2D profiles and automatically merge them into a single, smooth 3D path.
This technique is widely used in automotive design, consumer electronics, and industrial product design where smooth, continuous curves are required for features like swept bosses, lofts, or cutouts.
How to Create a Projected Curve
Using the Projected Curve tool is straightforward once you master the basic workflow outlined in this SW tutorial:
- Create the First Sketch: Draw your initial 2D profile on a primary plane (such as the Front Plane).
- Create the Second Sketch: Draw another 2D profile on an orthogonal plane (such as the Top Plane) that defines the trajectory from a different angle.
- Activate the Tool: Navigate to the Features tab, select Curves, and click Projected Curve.
- Choose Projection Type: Under the PropertyManager, select the Sketch on Sketch option and pick both 2D sketches.
- Generate the Curve: Click the green checkmark. SolidWorks will instantly generate a clean 3D curve at the exact intersection of both profiles.
Key Benefits of Using Projected Curves
- Precision: Eliminates the guesswork and errors associated with manual 3D sketching.
- Speed: Speeds up your modeling process by utilizing familiar 2D sketching techniques.
- Versatility: Pairs perfectly with Sweep, Loft, and Surface tools to form complex parts.
Final Thoughts
Mastering projection curves is a game-changer for anyone looking to elevate their CAD skills. Following a structured SW tutorial like this helps you build cleaner models faster and with greater confidence. Try incorporating projection curves into your next project to streamline your 3D workflow!


