
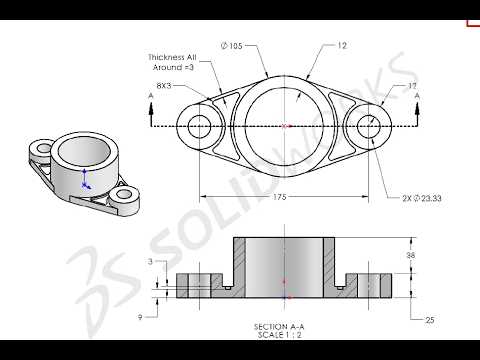
Transitioning from a flat blueprint to a fully realized 3D component is one of the most fundamental skills in mechanical engineering and product design. Whether you are a beginner taking your first steps or an intermediate designer looking to refine your workflow, mastering SolidWorks 2D CAD sketching is the essential foundation for building precise, stable 3D geometry.
In this practice guide, we walk through the complete process of converting a detailed drawing into a robust 3D parametric model, bridging the gap from basic drafting techniques to advanced feature modeling.
Why Precision 2D Sketching Matters
Every complex 3D part or assembly begins with a sketch created in SolidWorks 2D CAD. If a base sketch contains loose constraints, missing dimensions, or poor geometrical relationships, those issues will propagate throughout the entire feature tree of your model, making future edits difficult.
By focusing on clean, fully defined 2D profiles, you ensure that your 3D operations—such as extrusions, revolves, and cutouts—remain stable, editable, and ready for production.
Key Steps in the 2D to 3D Workflow
To convert any 2D technical drawing into a high-quality 3D model efficiently, follow this structured methodology:
- Analyze the Drawing: Review the dimensions, view orientation, and geometric symmetry before drawing your first entity.
- Establish the Base Sketch: Select the optimal reference plane (Front, Top, or Right) and sketch the primary outline using standard sketching tools and Smart Dimensions.
- Apply Geometric Relations: Utilize relations like horizontal, vertical, tangent, and concentricity to lock down geometry and achieve a fully defined status.
- Transform into 3D: Use primary features like Boss-Extrude or Revolve, followed by secondary operations like fillets, chamfers, and cutouts to finalize the part.
Elevate Your Design Speed and Accuracy
Consistently working on real-world practice drawings is the most effective way to build muscle memory and problem-solving confidence. By regularly sharpening your SolidWorks 2D CAD skills, you will minimize modeling errors, optimize your parametric design process, and drastically increase your design efficiency.
Ready to test your design skills? Fire up your software, follow along with the exercise, and turn flat concepts into dynamic 3D models today!


